Blog
A Step-by-Step Guide to Creating 3D Foam Embroidery

Source: www.digitizingmadeeasy.com
In the world of embroidery, innovation is the name of the game, and one trend that has caught the eye of hobbyists and professionals alike is the use of 3D puffy foam. It adds an unexpected and eye-catching dimension to your designs, transforming the ordinary into the extraordinary. Whether you’re looking to make a bold statement with your next project or simply want to explore the depths of your creativity, incorporating 3D puffy foam into your embroidery can take your work from flat to fabulous. In this comprehensive guide, we’ll dive into the plush possibilities of 3D foam embroidery, sharing valuable insights to take your stitching skills to a new level of sophistication. From selecting the perfect stabilizer to mastering the digitizing process for foam designs, we’ll cover everything you need to make your embroidery stand out—quite literally. Join us as we explore the exciting world of 3D puffy foam embroidery and help you add that impressive pop to your projects!
What is 3D Foam embroidery?

Source: www.sunwayembroidery.com
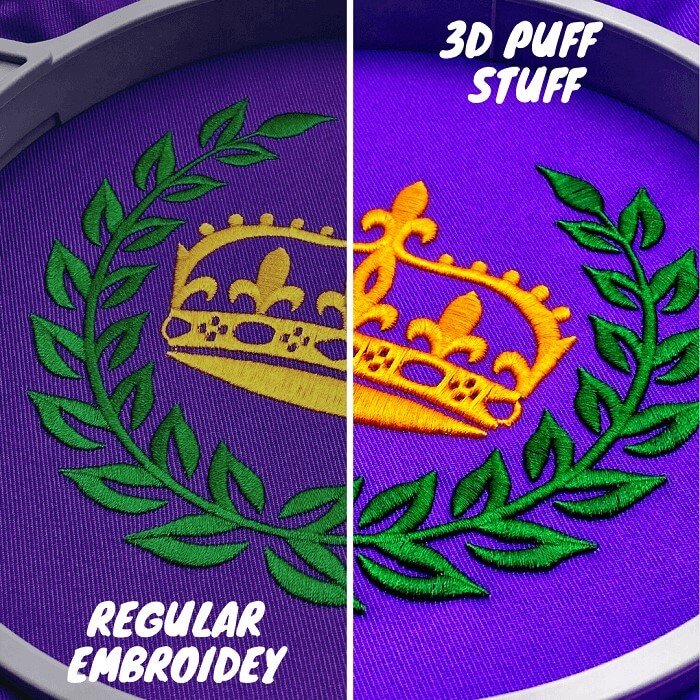
Foam embroidery, also regarded as 3D or puff embroidery, is a specialized technique used to give embroidered designs a raised, three-dimensional appearance. This effect is achieved by placing a piece of foam under the embroidery stitching area before the embroidery process begins. As the needle penetrates the foam and fabric, it essentially envelops the foam with threads, creating a puffed up effect once the excess foam is removed. The thickness of the foam can vary, which allows for different levels of elevation in the embroidery, providing a noticeable texture and a unique visual appeal. This method is particularly popular for embellishing caps, hats, jackets, and other sturdy apparel items, lending a dynamic and tactile quality to logos and graphic elements on the textiles.
Required materials and tools for 3D foam embroidery

Source: i.ytimg.com
It’s important to have the right materials and tools to achieve the best results. Below is a listicle of what you need to get started:
-
Embroidery Machine: First and foremost, you need an embroidery machine that is capable of stitching over foam. Ensure the machine is properly maintained and ready for 3D embroidery.
-
3D Embroidery Foam: This is the key material that creates the raised effect in puff embroidery. 3D foam is available in different thicknesses, typically 2mm and 3mm, and a variety of colors. Choose the thickness and color based on your design requirements.
-
Machine Embroidery Needles: Use sharp needles that can penetrate through the foam without problems. Size 75/11 or 80/12 are commonly used for foam embroidery.
-
Embroidery Thread: A strong, top-quality embroidery thread is essential. Polyester thread is often preferred for its strength and colorfastness, which is important as the thread will have to cover the foam completely.
-
Temporary Adhesive Spray: A temporary adhesive is used to hold the foam in place on the fabric while stitching. It prevents the foam from shifting and ensures the design lines up correctly.
-
Small Sharp Scissors or Tweezers: After the embroidery is complete, the excess foam needs to be removed. Use small, sharp scissors or tweezers for precision removal without damaging the embroidery.
-
Backing/Stabilizer: A good quality stabilizer supports the fabric and helps maintain stitch integrity. Choose the appropriate backing for your garment material.
-
Embroidery Software: If you’re creating your own designs, embroidery software is necessary to digitize the design specifically for 3D foam embroidery.
-
Digital Embroidery File: A digitized embroidery file tuned for 3D embroidery that ensures the stitches properly cover the foam.
-
Hoop: A sturdy hoop that can tightly secure the fabric and maintain tension is essential. This prevents shifting during the embroidery process.
Additional Helpful Tools:
- Heat Gun: If any small strands of foam remain after trimming, a heat gun can gently melt these away without affecting the thread.
- Nippers or Clippers: These can be used for trimming threads during the clean-up process post-embroidery.
Quick Reference Table:
| Tool/Material | Purpose |
|---|---|
| Embroidery Machine | For stitching the design over the foam |
| 3D Embroidery Foam | Adds the raised, 3D effect |
| Embroidery Needles | To stitch through fabric and foam |
| Embroidery Thread | Covers the foam and forms the design |
| Temporary Adhesive | Secures the foam in place |
| Scissors/Tweezers | Removes excess foam after stitching |
| Backing/Stabilizer | Supports the fabric during embroidery |
| Embroidery Software | For designing and digitizing custom patterns |
| Digital Embroidery File | Contains the digitized design |
| Hoop | Holds the fabric in place during embroidery |
| Heat Gun (Optional) | Removes stray foam strands after trimming |
| Nippers/Clippers (Optional) | For thread clean-up |
Remember that mastery of 3D foam embroidery requires practice. Each material and tool plays a pivotal role in successfully achieving the desired raised effect. With the right preparations, you’ll be well on your way to adding a unique touch to your embroidery projects.
3D Puffy Foam Embroidery Designs

Source: blog.hatchembroidery.com
It is crucial to recognize that not all embroidery designs are suitable for 3D foam. To avoid any potential damage to your machine or fabric, I strongly recommend selecting designs that have been explicitly digitized for use with foam. This attention to detail ensures safe and successful creation of your embroidered piece.
When selecting a design, it is essential that the 3D puffy foam embroidery designs you choose are framed with a perforated edge. This construction allows for the foam to tear away neatly, akin to using a well-crafted cookie cutter on dough; without a definitive edge, the result is less precise and appealing.
Here’s a comparison to consider:
| Embroidery Without Perforated Edges | Embroidery With Perforated Edges |
|---|---|
| Foam tears unevenly, resulting in a messy look. | Foam removes cleanly, providing a sharp finish. |
| Design appears unfinished or flawed. | Design maintains its intended 3D effect. |
| Machine and fabric integrity could be compromised. | Ensures the safety of both machine and garment. |
Please remember, the success of 3D puffy foam embroidery hinges on its synergy with designs purposefully digitized for foam application. Approaching it with the right designs not only preserves the lifespan of your embroidery assets but also guarantees an exemplary finish to your work.
What Stabilizer Should I Use for 3D Puffy Foam Embroidery?

Source: www.onembroidery.com
Choosing the appropriate stabilizer for 3D puffy foam embroidery is crucial and it largely depends on the type of garment you’re embellishing. For instance, if I’m working on hats, I’ve found that a tear-away stabilizer is highly suitable. Given that hats are rigid and don’t require frequent washing, this type of stabilizer can easily be removed without damaging the structure or the integrity of the embroidered foam.
On the other hand, when it comes to embroidering wearable items, my go-to is a cutaway mesh stabilizer. My rule of thumb here is simple: “if you wear it, don’t tear it.” I opt for no-show mesh to prevent it from being visible through the fabric, thus ensuring a clean and professional finish to the embroidered design.
The key is to match the stabilizer to the garment’s properties for optimal results in 3D foam embroidery. If you’d like to learn more about different stabilizers, when and where to use them, click here:
Click me!How to Embroider 3D Puff Foam: Steps & Overview

Source: www.digitizingmadeeasy.com
Here’s how to accomplish stunning results in your embroidery projects:
1. Select Appropriate Design
- Complexity: Opt for simpler, bold designs. Intricate details can be lost or distorted when using puff foam.
- Size: Larger areas work better with puff foam to allow for the material expansion.
2. Choose the Right Foam
- Thickness: Commonly, foam comes in 2mm to 6mm thicknesses. Choose the thickness based on the desired height of your design.
- Color: Match the foam color to your thread color to make any small imperfections less noticeable.
3. Material Preparation
- Fabric Choice: Sturdy fabrics work best, as they can handle the tension without puckering.
- Stabilization: Use a firm stabilizer to support the fabric and the foam during the stitching process.
4. Hooping Technique
- Tautness: Ensure the fabric and stabilizer are hooped tightly so that they remain stable.
- Alignment: Center and align your fabric appropriately in the hoop for accurate design placement.
5. Machine Settings Adjustment
- Density: Increase stitch density to fully cover the foam.
- Speed: Lower the machine speed to give more control during the stitch process.
6. Foam Placement
- Position the foam: Place the foam over the area where the embroidery will occur, covering it adequately.
- Secure the foam: Use a temporary adhesive spray or basting stitches to keep the foam in place.
7. Embroidery Execution
- First stitches: Begin with the first color or section of the design to tack down the foam.
- Continue embroidery: Proceed with the embroidery, making sure that foam edges are being caught by the stitches.
8. Remove Excess Foam
- After stitching: Once the embroidery is complete, gently tear away any excess foam from around the embroidered design.
- Fine-tuning: Use small embroidery scissors or a foam pick to remove any small pieces of foam that remain.
9. Finishing Touches
- Clean up: Ensure all loose threads and foam pieces are removed for a clean finish.
- Heat treatment: Apply heat (via heat gun or hairdryer) to shrink down any small foam remnants for a crisp look.
10. Evaluate and Adjust
- Assessment: Examine your completed piece for quality and make any necessary adjustments to machine settings for future projects.
- Learning: Take note of what worked well and what could be improved based on the outcome.
By following these steps and paying attention to the nuances of working with 3D puff foam, you can elevate your embroidery projects to a new level, creating impressive, textured designs that truly stand out.
And there you have it! Making 3D foam embroidery with puffy foam and your embroidery machine may seem complicated at first, but with a little practice, you’ll be able to master it and create stunning designs that will impress all. We hope you found this tutorial helpful and if you have any questions or additional tips, please feel free to share them with us in the comments below. Happy embroidering!


